Growing the cell bodies
This stage turns the tracked nuclei into whole cell bodies: for every nucleus, an outline of its full cell in each frame, carrying the same identity the nucleus already holds. It implements the approach described in the overview: rather than segmenting the cell bodies and then linking them across time, each body is grown outward from its tracked nucleus, so that the body inherits the nucleus’s identity.
The nuclei arrive already tracked from the previous stage, each with one identity that holds across the whole movie. Because every body is grown from one such nucleus and takes its label, the bodies are tracked as soon as they are drawn. This stage therefore solves only segmentation, one frame at a time; the correspondence across time is supplied by the nuclei rather than computed again.
The stage consumes three inputs: the cell foreground and contour maps built in the input maps stage, and the tracked nucleus labels from the previous stage. It proceeds in three steps: the maps are cleaned, the region to fill is fixed, and a cell body is grown from each nucleus into that region.
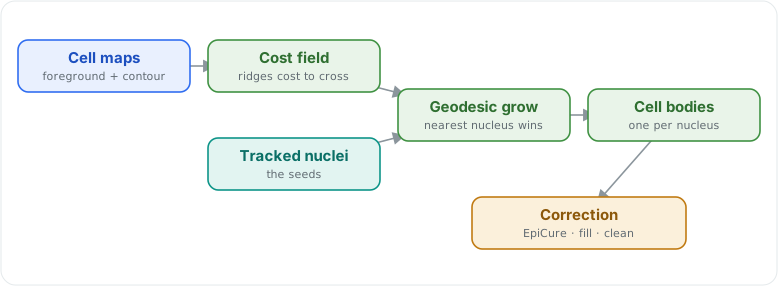
Each cell body is grown from its tracked nucleus through a cost field built from the cell maps: the nuclei are the seeds, the geodesic grow assigns every pixel to its nearest one, and the result is corrected.
Each cell body is grown from its tracked nucleus through a cost field built from the cell maps: the nuclei are the seeds, the geodesic grow assigns every pixel to its nearest one, and the result is corrected.
Preparing the maps
The cell foreground and contour maps are cleaned the same way the nucleus maps are: the local background of each is subtracted, so that a single threshold separates cell from background across the whole frame rather than only where the image is bright. The cleaned foreground is then thresholded into a fill territory, the region cells are grown into: a pixel belongs to it if the cleaned foreground is above the cutoff, or a nucleus already occupies it.
A boundary between two cells is sometimes strong in most frames but momentarily faint in one, which would let the two cells bleed together in that frame. The cleaned contour map is therefore smoothed across time before the bodies are grown, so that a boundary present in the surrounding frames persists through a frame in which it briefly weakens. The smoothing runs in both directions along the movie and adapts to the contour strength: a strong ridge overrides the carried memory, while a carried ridge decays if it is not renewed, so a single strong frame does not leave a permanent mark. Because it reads along time, it needs every frame of the movie and cannot be derived from a frame on its own; the live preview computes it across the whole movie and shows the current frame’s result.
These settings sit in the Segmentation Parameters panel, under the Map cleanup and Temporal smoothing headings. The values below are those configured for the example data and used on a first run. For other images, the foreground Threshold, which sets how much of the frame is filled, is the parameter most likely to require adjustment.
Setting |
What it does |
Default |
|---|---|---|
Strength (foreground) |
How much of the foreground map’s local background to subtract before thresholding: |
|
Threshold (foreground) |
How bright a cleaned point must be to fall inside the fill territory. Higher values fill less of the frame. |
|
Window (foreground) |
The neighborhood size, in pixels, used to estimate that local background. |
|
Strength (contours) |
The same background subtraction applied to the contour map. |
|
Floor (contours) |
A noise floor on the normalized contour: values below it are set to zero, so faint speckle does not act as a wall. |
|
Norm % (contours) |
The percentile of the contour signal mapped to the top of the |
|
Window (contours) |
The neighborhood size for the contour background. |
|
Memory τ |
The contour strength treated as the crossover between trusting the current frame and trusting the carried memory. |
|
Memory floor |
The slowest rate at which a carried boundary fades when it is not renewed, which prevents a permanent ghost. |
|
Growing the bodies
A cell body is grown from each nucleus by a contour-aware Voronoi rule. Every pixel in the fill territory is given a cost: low in the open interior of a cell, high on a contour ridge, so that crossing a boundary between cells is expensive. From each nucleus, the least costly distance to every reachable pixel is measured, and each pixel is assigned to the nucleus it can be reached from most cheaply. Because crossing a ridge is costly, the bodies grow until they meet at the ridges and stop there, so the boundary between two cells settles on the contour that separates them. Nucleus pixels are held to their own cell, so a body always contains its seed.
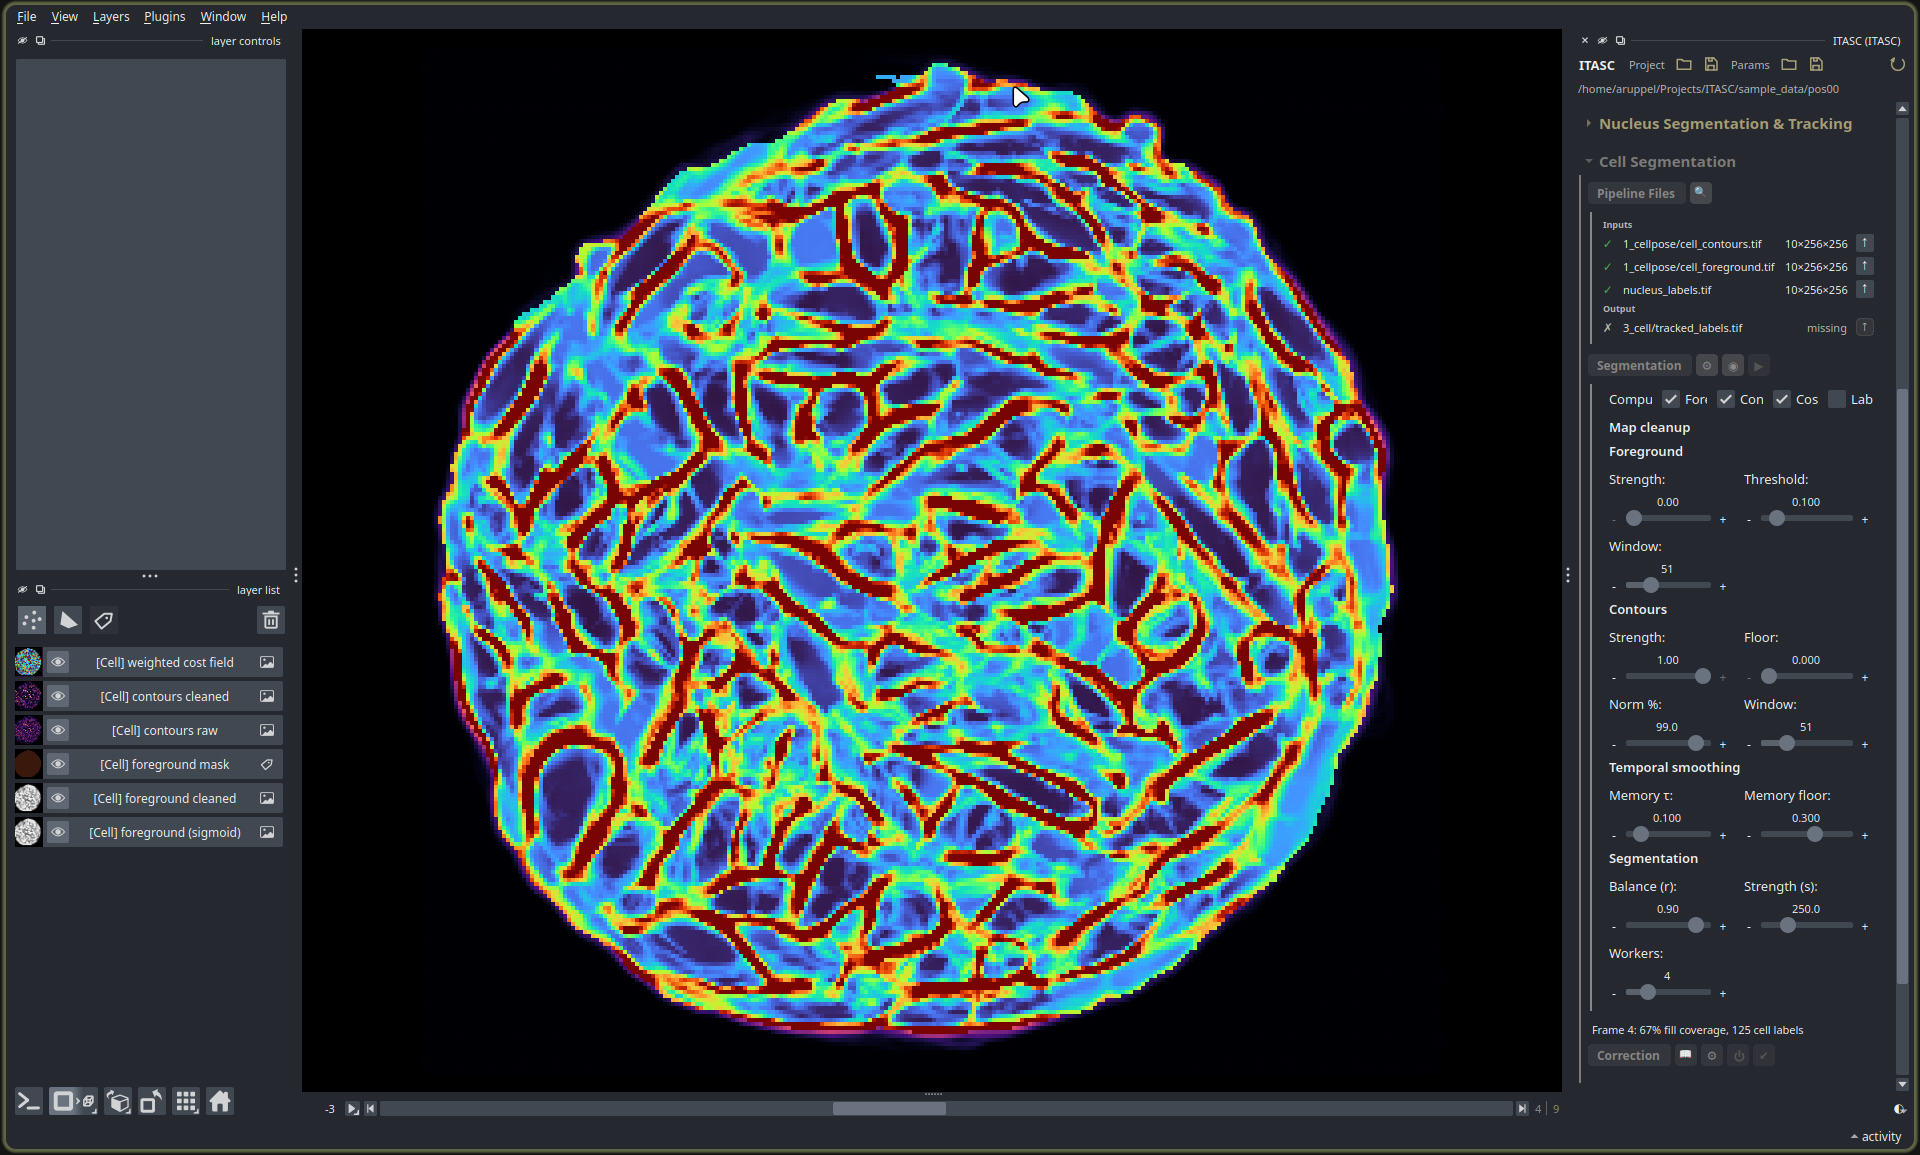
The weighted cost field for one frame, in the main canvas: dark red where a contour ridge makes crossing expensive, blue and purple in the low-cost cell interiors. Each cell body is grown from its nucleus through this field and stops where the cost rises, so the red ridges are where neighboring bodies meet. The panel on the right holds the settings described in this page.
The cost combines the two maps as cost = 1 + s · [r · contour + (1 − r) · (1 − foreground)],
with two knobs. Balance (r) splits the cost between them: 1 places boundaries from the
contour ridges alone, 0 from the foreground alone. Strength (s) sets how strongly the
maps bend the growth away from a plain distance split: at 0 the rule reduces to a distance
Voronoi, in which two cells simply meet at the midline between their nuclei, and as it rises
the boundaries are pulled onto the contour ridges instead.
Each body takes the track identity of the nucleus that grew it, so the cell labels are tracked across the movie with no further linking. A pixel in the fill territory that no nucleus reaches is left as background.
Setting |
What it does |
Default |
|---|---|---|
Balance (r) |
The split between the two maps in the cost, from |
|
Strength (s) |
How strongly the maps bend the growth away from a plain distance split between nuclei. |
|
The panel previews each intermediate on the current frame for tuning, without growing the
bodies across the whole movie. The Compute row toggles which layers are shown: Foreground and
Contours show the cleaned maps, Cost shows the cost field above, and Labels
additionally runs the growth on that one frame. With the parameters set, the full stack is
run and the tracked cell labels are written to 3_cell/tracked_labels.tif.
Correction and the result
The grown labels are corrected in a tool of their own, deliberately lighter than the one used for the nuclei. It has no candidate gallery: a cell body is grown from its nucleus rather than chosen from a database of alternatives, so there is no set of pre-built outlines to swap among. It also does not create, delete, merge, or relink cells, because a cell’s identity is its nucleus’s and those operations would break that correspondence. What it corrects is the shape of a boundary the growth placed wrongly.
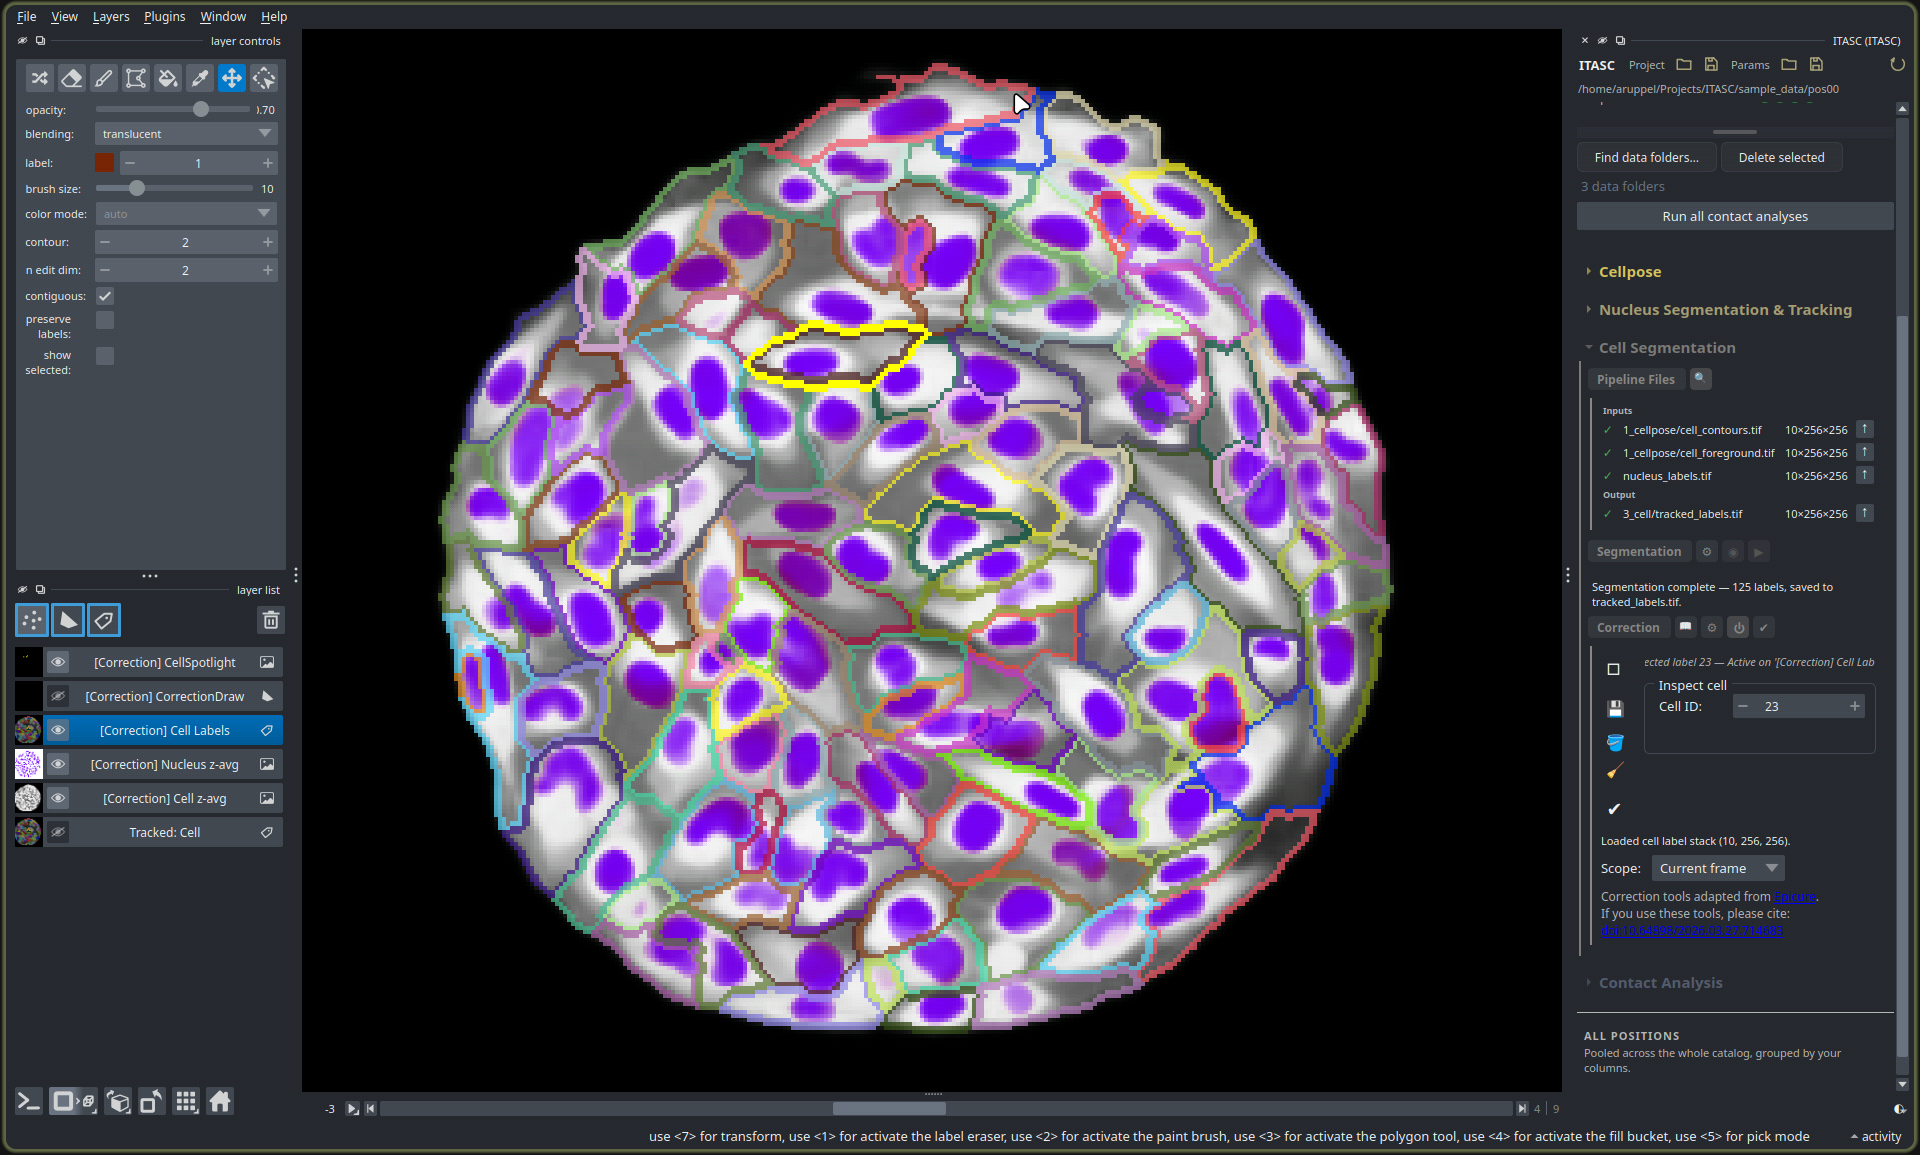
The finished cell bodies, in the correction tool: each cell is an outline around its nucleus, colored by identity, tiling the monolayer with no gaps. The cell and nucleus reference images are drawn underneath (the nuclei in purple) so edits are made against the signal. One cell is selected in yellow, and the panel reports 125 labels written.
A cell is selected by clicking it, and its identity is shown in the inspector. Its boundary is reshaped by hand: Shift with a left-drag extends a cell’s outline, Shift with a right-drag carves it back along the drawn line. Two cleanup actions follow such an edit: Fill Holes closes background gaps fully enclosed within a cell, up to the Hole radius in pixels, and Remove Stranded Fragments drops disconnected specks that broke off a label. Scope sets whether these two apply to the current frame or the whole stack. Show outlines only draws the labels as contours so the reference images stay visible beneath them. These editing tools are adapted from EpiCure; cite it if you use them.
When the labels are correct, they are saved, and Finalize promotes them to the cell labels the final stage reads.
Where the cells go
Each cell now has a body and an identity in every frame, aligned with its nucleus. The final stage, measuring the result, reads these bodies to find which cells touch, follows each contact through time, and records the moments neighbors swap.